Tuesday, December 27, 2011

My Favorite Things #3: Animals & Such

You knew this post was coming, right? It's inevitable. I mean, I'm a girl and I like baking and crafts, so it naturally follows that I will also like animals. And that I just might want to write about them. But don't worry, this isn't a post full of gushing about how cute puppies are or how wonderful (ha!) kitties are (I definitely do NOT want to put them in a basket). This is a post about some unusual, but awesome, animals you may not have known existed that also happen to be adorable. And then there are puppies.

So all you guys who read my blog, you have been warned. Leave now if you don't want to lose man points.

Ready? Here we go!

#1: Penguins

From: Animal Planet

Look at them!! They're so incredibly adorable! I think they're hilarious when they walk around with their wings thrown out behind them like they're pretending they have capes. It's great!

By the way, these are the Adelie penguins, one of the smaller breeds. They're my favorite breed.

From: A Boston Girly at Heart
Awww, penguin love! Also, if you click on the link you can see more adorable pictures of penguins being all lovey-dovey.

Did you know penguins mate for life? Another reason to love them!

#2: Chinchillas


Chinchillas are adorable! They have fluffy long tails and super soft fur. I first saw one in a PetsMart when I was in high school and fell in love with their cuddlyness. I've wanted one ever since, but have never really been in a position to buy one. But soon, soon I shall have a chinchilla.

Disclaimer: Chinchillas require a lot of TLC, and can be difficult for some people to take care of. Please do your research and don't buy a chinchilla unless you think you can devote the time and care they need. Deal?

#3: Pygmy Rabbits


Ok, you might need to sit down for this one, because the cuteness might just knock you over. It's a bunny that can fit in the palm of your hand. 


From: Analik

Awww!!! Look at those little ears!! And little paws!! And the whiskers!!!

Ah hem, excuse me, I forgot myself.

Anyways, I've loved rabbits ever since I was a little girl. I had this little stuffed rabbit that I named Henrietta when I was 5. Don't ask me where I got that name...I was a rather strange child.

FYI: Pygmy rabbits are an endangered species native to the Columbia Basin of the northwestern United States. With only 16 adults left in 2001, they were taken into captivity in an attempt to boost their numbers and have been reintroduced little by little. The people at Washington State University just about squealed for joy when they found several litters in the wild in 2007. These little guys are making a comeback!

#4: Puppies


Yeah, you knew it was coming. What list of cute animals would be complete without puppies? They're the epitome of fun, playful cuddlyness and no small child can resist their charm.

From: Cute Puppies for Sale

No post about puppies would be complete without a weenie dog! They have those cute little short legs that make them look like they're leaping as they run. Seriously, I empathize with those little guys. My legs are short, too. 

From: Beagle Dog Training Tips

My first dog was a little beagle puppy. I was 5, and I named him Charlie after the main character in All Dogs Go to Heaven. I loved that movie when I was a little girl! Well, we had to give Charlie away when we moved because we didn't know whether the new yard would be big enough for him. I sometimes still miss the little guy. He was a good puppy.


Well, I think that's enough cuteness for one post. I'm going to go research chinchilla care...

Wednesday, December 21, 2011

DIY Christmas Gifts #5: Munchies

This one goes out to all you last-minute shoppers who wait until December 21 or later to buy gifts. The lines in the stores are going to be insane from now on, so running to the local big box retailer for a light-up reindeer Christmas sweater is not a viable option. What to do? What to do?

Here's a solution that is both easy and cheap: make baked goodies! Package them in cellophane bags (available at Hobby Lobby, my go-to store, in the party section), close them with metallic twist ties (in the cake decorating section of Hobby Lobby) and use curling ribbon to finish it off. Attach some homemade labels and you have a super cute, super simple, super cheap gift that you can make in mass batches for last-minute hostess gifts or stocking stuffers.

Here are a few of my favorites that I have made in the past for friends:

Source: Betty Crocker
Puppy Chow: always a hit. Perhaps it should be called Reindeer Chow in light of the holiday season...


Source: Allrecipes.com
Gingerbread that you can actually chew! These cookies were a big hit with my coworker who claims not to like gingerbread. That's because he's used to the thin, hard, crispy cookies that people normally make, and these are actually soft.


Source: Brown Eyed Baker
Hot chocolate mix. Customize with crushed candy canes or different kinds of chocolate. You can also add the same spices used in the gingerbread cookie recipe and substitute brown sugar for white sugar. 


Source: Bakerella
Red velvet cake balls. I once made 2 batches for a small get-together and left with empty serving platters!


Source: Allrecipes.com
Tiger butter. This is actually something my old high school friend would make every year. Watch out: it's addicting!


Monday, December 19, 2011

DIY Christmas Gifts #4: Heart Handwarmers

OK, so this is a great gift to make in bulk as stocking stuffers for family and friends. They're really quick and easy to make, and the material is usually on sale around this time of year. I found mine at Hobby Lobby (yay 40% off coupon!). Plus, a yard will give you enough for at least 10 people. Score!

You will need fleece, thread, needles and pins, scissors, rice, and a funnel.

Layer two pieces of fleece and cut into a square that is about 1 1/2 times the size of your palm.


Fold the two squares in half and cut a half heart out of the side with the fold. Remember when you were in elementary school and you made hearts in arts and crafts? Yeah, it's like that.


And when you've got your heart all done, make sure you pin the sides so it doesn't move around while you're sewing.


Three pins works just fine for this little heart.


And if you cut anything like me, you'll need to trim the edges to make them line up.


Now thread your needle, and tie about 3 knots in it (the fleece is more stretchy than most fabrics, so you have to tie more knots to keep it from pulling through). Start sewing the two pieces together with a whip stitch along the edge. A whip stitch, for you novice seamstresses (or seamsters, I suppose), is a really easy, basic stitch often used to close a hem. You insert the needle from one side of the fabric to the other at the edge, then bring the needle around to the exact same side and repeat the motion until you run out of thread or have to tie off. (And before you start thinking that I am an accomplished seamstress, I had to look this up to provide a tutorial because I didn't know the proper terms!)


Keep going until you have a small opening that you can use to turn the heart inside out.


Now turn the heart inside out and go get your rice. I used jasmine rice because I'm hoping that when it's heated up, it will smell nice.


Use a funnel to put enough rice to fill the heart, but leave enough room that the rice can move freely. It should feel more like a beanbag and less like a hackey sack.

Fold over the opening and use the whip stitch to close it off.


And there you go! A cute little heart handwarmer that will smell like jasmine (I hope) when it's warmed up.

Side note: make sure you don't overheat the rice, or it will stop warming up. My powerful microwave warms it up nicely at 1 minute 30 seconds.

Can't you just see putting this in a little stocking on your mantle? It's just so precious! I can't wait to give them to the fam!

Monday, December 12, 2011

DIY Christmas Gifts #3: Photo Coasters

These coasters were actually inspired by a gift from my friend Brenda. She made me this cute little coaster with pink and green scrapbook paper and flowers and it's been brightening up my desk since my birthday! She said it was really easy to make, but I was kind of afraid to attempt it. I mean, there's tile and polyurethane sealant. Not such a great combination for me...

But, my grandmother really loves pictures. I've given her paintings and professional photographs and frames in the past, which was great, but how could I possibly top a homemade painting? Then the answer came: coasters with pictures of my aunt and uncles on them! It's perfect! It's original, thoughtful, and absolutely adorable.

Want to know how I made them? It's not as hard as you think!


First, you will need: four tiles (you can get individual tiles at home improvement stores), Mod Podge, waterproof polyurethane sealant (available at craft stores in the paint section..yeah, it took me forever to find it), little self-stick felt circles (in the framing section, of all places), photocopied pictures, and paper of some kind to decorate the tile with.


And there's what the sealant looks like. It looks expensive, but that little bottle only cost $2! And it's lasted through 2 of these projects so far, and I think I still have over half of it left. Now what shall I use the rest of it on? Hmm...

So, it's super important that you use only smooth, thin paper for the decoration. I once tried to Mod Podge a tree onto a canvas using this really cool textured brown paper for the trunk, and not only did it refuse to stick, but it ruined my entire canvas! Lesson learned. Or was it?

By the way, it really helps if you turn over the paper, trace the tile, and then cut it out. Trying to measure and draw a straight line for the sake of pride just isn't worth it.


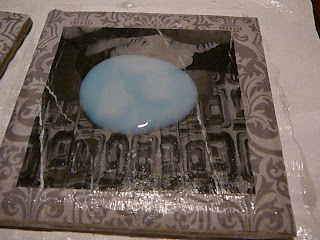
Now apply a base coat of Mod Podge to the clean tile. This gives the second layer something better to stick to.

Apply a second coat, and while it is still wet, press a cut out piece of scrapbook paper down until the edges don't stick up anymore. Now, I decided to make this one go all the way to the edge, because the sand color clashed with the grey. The last one I did left a small border around it, and it still looked cute. Hooray for artistic license! 

In hindsight, I wish I had gotten a thinner piece of scrapbook paper. This was one of those double-sided ones from Michael's, so it was a little thicker than usual. And boy, was that paper persnickety! Those edges just did not want to stay down. I had to keep running the handle of the foam brushes along them because they kept popping up. Seriously, you would think I had learned my lesson about fancy scrapbook paper from the tree debacle.


Once that dries, then another layer of Mod Podge goes on top. This was mainly to provide something for the pictures to stick to. Remember to add any other layers while the bottom layer of Mod Podge is still wet. Make sure you seal the last layer with a final coat of Mod Podge, making sure to get along the edges and down the sides to seal it.


Wondering who that little girl is? Yep, that is my aunt. And she hasn't changed a bit.


Once that's all dry, apply two coats of the polyurethane sealant. And make sure you open a window, because that stuff smells really bad. Ugh, my whole living room smelled like...well...some really strong chemical! So glad I had already eaten dinner, or I would have lost my appetite! Which, of course, would have been tragic.


And now, once everything is all dry, flip those beautiful masterpieces over and add the protective dots on all four corners. These are a hard plastic kind, but the felt circles look cute too. I just didn't use those because the only kind available was this hideous shade of green. Ugh! Remember, this step is really important, unless you want your gift to scratch your recipient's tables. Then you can skip it.

So, I'm really pleased with how these little guys turned out! They're really cute and sweet and just simply wonderful! I really hope my grandmother likes them. I made some for my mom, too, but the pictures from that aren't posted because 1) she already knows she's getting coasters, and 2) she reads my blog sometimes and I don't want her to see them before Christmas.

Monday, December 5, 2011

DIY Christmas Gifts #2: Marinade Mix

My uncle loves Asian food and cooking almost as much as I do. In fact, he runs the kitchen for the family restaurant and makes the most wonderful steak I've ever eaten in my whole life! So this Christmas I thought he would really enjoy all the ingredients to make a delicious Korean beef bulgogi marinade.

Beef bulgogi is like a salty-sweet BBQ made with flank steak. It's so deliciously wonderful and not at all spicy. Unless, of course, you put Sriracha on it. Mmm...

Taken from: The Oatmeal web comic

And that is totally how I feel about it.

Anyways, since there were several dry ingredients and only a few wet ingredients, I decided to put together all the dry ingredients in a small Pyrex bowl that my uncle could use to make custard or brule or whatever his culinary heart desires and leave the wet ingredients in their original packaging. Then I wrote down a modified recipe and wrapped everything separately. *Insert evil laugh here.* Oh, the look on his face will be priceless as he opens each part of the gift and tries to figure out what it all means! (I put the instructions on the bottom, by the way.)

Here's the complete recipe:

Beef Bulgogi
Taken from an Allrecipes.com recipe

  • 1 pound flank steak, thinly sliced
  • 5 tablespoons soy sauce
  • 2 1/2 tablespoons white sugar
  • 1/4 cup chopped green onion
  • 2 tablespoons minced garlic
  • 2 tablespoons sesame seeds
  • 2 tablespoons sesame oil
  • 1/2 teaspoon ground black pepper

  1. Place the beef in a shallow dish. Combine soy sauce, sugar, green onion, garlic, sesame seeds, sesame oil, and ground black pepper in a small bowl. Pour over beef. Cover and refrigerate for at least 1 hour or overnight.
  2. Preheat an outdoor grill for high heat, and lightly oil the grate.
  3. Quickly grill beef on hot grill until slightly charred and cooked through, 1 to 2 minutes per side.


OK, now I need to go find delicious Asian fare in my part of the city. So far I have found a worthy Thai restaurant, but only Pei Wei and several icky Asian buffets serve other kinds of Asian dishes. Soon, I shall make the trek up to H Mart, and then I can stock my pantry with boba tea bubbles, lemongrass puree, mochi, lychee, ginger candies, rice sticks, and curry pastes! Oh, and Naan bread!! 

And then my tummy will be happy again. 

Saturday, December 3, 2011

DIY Christmas Gifts #1: Mixed Media Art

As a recent college grad, I don't have tons of money to spend on fancy-schmancy gifts for my family and friends. I'm sure most of ya'll are in the same boat as me, so I'm going to spend the next several posts describing the gifts I'm making for people (but I'm not going to tell you who they're for, because some of them read this blog!) so you can give great, from-the-heart homemade gifts too.

The first gift I will be discussing is actually a birthday present for my friend Katie. I know I said I wouldn't name names, but she'll be getting this gift long before anyone reads this blog, so she's the exception. And Katie, if you are reading this, I hope you are enjoying your painting.


This painting is actually what the artists call "mixed media" because I used more than just canvas and paint to create it. This little heart is made from scrapbook paper and written on with a Sharpie.

OK, to create a similar piece, you will need: a canvas (mine was an 11" x 14" canvas from Hobby Lobby), enough scrapbook paper to cover what shape you want to make (I used two 8 1/2" x 11" pink metallic sheets), Mod Podge (shiny or matte - your preference), a ruler, a foam brush, a painter's cup (if you don't want to dip your brush in the bottle of Mod Podge) a pencil, and a Sharpie (mine was a thin line).


So I'm sorry that I don't have more pictures of the process, but I was making this late last night so it would be ready for Katie's visit today. I'll do my best to be super-descriptive, OK?

First, you will need to draw two lines on the canvas with the pencil to separate it into four equal sections. This will help you center the heart and make it all even. And don't worry, even really pale paint will cover the pencil marks...with enough coats, that is.

Next, use the pencil to draw the heart to whatever size your heart desires. I really liked the scrapbook paper, so I wanted to cover as much space as possible with it.

Paint the area outside the heart with two (or three, depending on the color and thickness of the paint) coats of acrylic paint. Since mine was a thin paint used mainly for crafts and not professional art, I needed two coats even though it was black.

While the paint dries, tear up the scrapbook paper into several small pieces. I think most of mine ended up being a little smaller then a square inch. I like to make mine all different shapes, but since they will be layered over each other, it really doesn't matter what shape you tear yours into.

Once the paint is dry, coat a small part of the canvas with the Mod Podge. Place a few pieces of scrapbook paper over the prepped spot, and work quickly, because this stuff dries really fast! Coat the scrapbook pieces and the area around them with Mod Podge and continue layering, making sure that no little corners get turned up and that all the edges are sticking to the canvas. Repeat this process until your surface is covered to your liking. You should also spread the Mod Podge to the edges of the canvas, even though you're not putting anything there, because otherwise the finished piece will look funny. Mod Podge dries clear, but it is still kind of shiny.


See what I mean by layering? It sort of looks like a mosaic.

A Sharpie will write very nicely over the Mod Podge and dry super quickly without smearing, although you will need to keep a piece of paper nearby to scribble on because sometimes the writing tip will start to fade. But don't worry! A few squiggles on a piece of paper and your Sharpie will be good as new.


I love this verse! It's such a wonderful reminder of God's love for me, and it makes me think of the dawn and all its beauty, and how God's mercies are new every morning. God's love is so true and trustworthy, and he'll never leave me or forsake me!

By the way, the verse Psalm 143:8, the NIV version.